AWS Prerequisites
Review the prerequisites and steps for connecting ChaosSearch to your Amazon Web Services (AWS) S3 cloud storage.
If you use AWS cloud storage for your log and event files, the following topics describe how to provision ChaosSearch with access to your AWS cloud-storage buckets. ChaosSearch supports several configuration methods, such as:
- Using the AWS interfaces to manually configure access using Identity and Access Management (IAM) interface (steps are described in this topic)
- Using AWS CloudFormation to perform the access configuration
- Using Terraform and the AWS provider to perform the AWS IAM management tasks
As a good practice, use the CloudFormation and Terraform scripts to set up the access for ChaosSearch. The following sections in this topic provide an overview of the manual process to set up access to show the tasks.
IAM Access Instructions
The following sections show the steps to configure the role, policy, and associations that ChaosSearch requires to read log and event files in your S3 storage buckets for indexing.
If you are not comfortable with using IAM directly, consider using the CloudFormation method as a programmatic way to configure the access.
The AWS interface screens could vary.There are multiple versions of the AWS console and the order/terminology of following steps could be different for your version. These steps are intended as an overview of how to configure access roles and permissions, and are intended for users who are experienced with the IAM user interfaces.
ChaosSearch S3 Bucket AccessTo read the bucket(s) that you want to start indexing, ChaosSearch must have discover and list privileges for the S3 buckets. If you have any questions, please contact the ChaosSearch Customer Success team.
Create a New Role for ChaosSearch in AWS
Use Amazon IAM to define the permissions that grant ChaosSearch access for reading the content of cloud-storage buckets.
To create a new role for ChaosSearch access:
- Log in to your AWS console.
- Navigate to the Roles page of the IAM service (Services > IAM > Roles).
- Click Create role.
- In the Create role window, click AWS account.
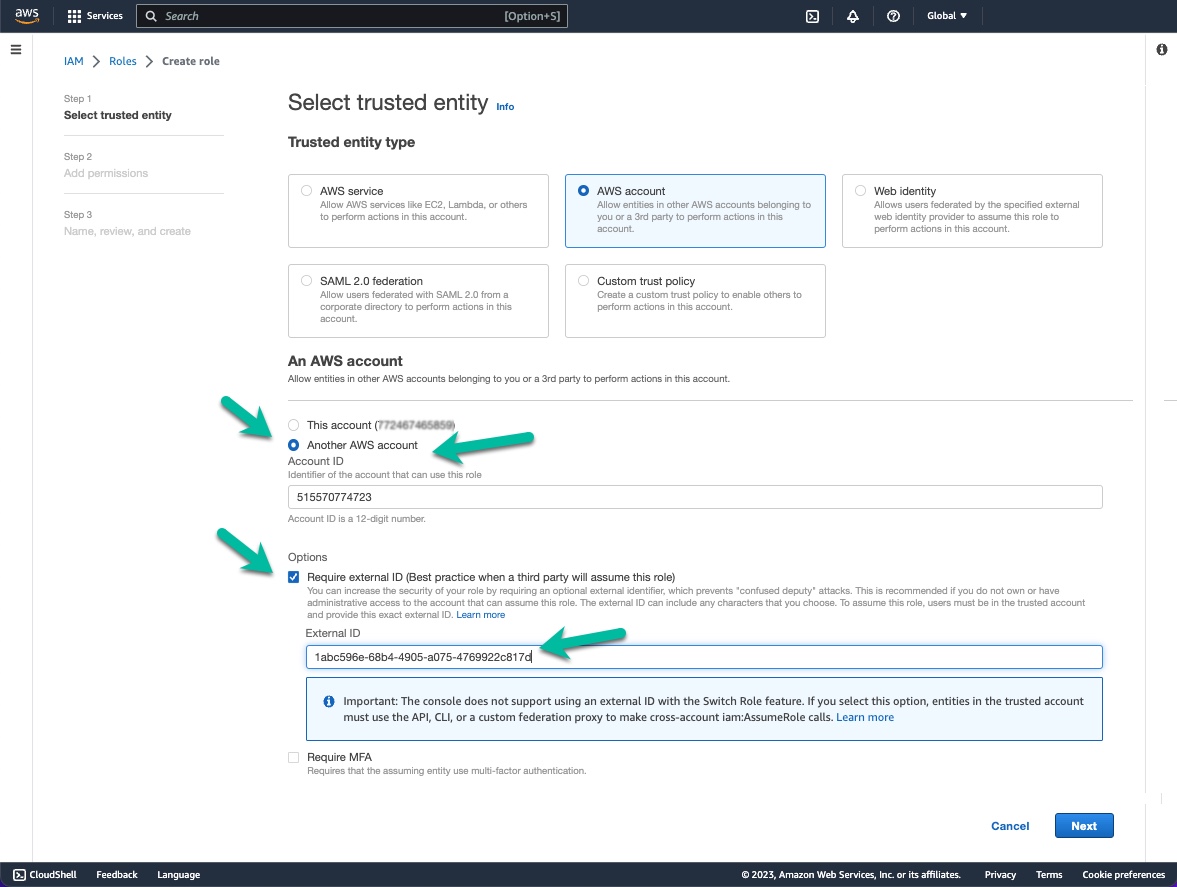
- Type the ChaosSearch AWS account ID (515570774723) in the Account ID field.
- Check/select the Require external ID option.
- In the External ID field, paste or type the external ID for your ChaosSearch account. You can obtain the external ID from your ChaosSearch portal Settings/Help page for the AWS Credentials.
- You must add the following accounts as AWS account and root principals for your ChaosSearch policy definition. You could add all four at once, or if you are a trial/POC site, add the trial account at first and then edit and use the production account when the trial-to-production transition occurs. (The trial and other two trust principals are added automatically by the Terraform and CloudFormation templates.) Contact your ChaosSearch Customer Success team if you have any questions.
515570774723 (for all environments)
268357474475 (for trial/POV environments)
079363773741 (for all environments)
291240392334 (for production environments)
{ "Version": "2012-10-17", "Statement": [ { "Effect": "Allow", "Principal": { "AWS": [ "arn:aws:iam::079363773741:root", "arn:aws:iam::515570774723:root", "arn:aws:iam::268357474475:root" ] }, "Action": "sts:AssumeRole", "Condition": { "StringEquals": { "sts:ExternalId": "<your ChaosSearch external ID>" } } } ] } - Click Next: Permissions. The Create policy page appears.
- Proceed to the next section to define your policy permissions for the role.
IAM Role Policy Permissions
Follow these steps to grant ChaosSearch read access to the AWS storage buckets. You can configure different access policies, such as:
- Access to a specific bucket (recommended)
- Access to buckets that share a common prefix name value
- Access to all buckets (not recommended)
NOTE:If you want to grant full access to ChaosSearch, you can assign one of the AWS predefined policies instead of creating a custom policy for more specific bucket access.
For example, you could attach the “AmazonS3FullAccess” policy to your custom ChaosSearch role, skip the section for creating a custom policy, and proceed to the Attach the Policy section.
Read-only Permissions – Specified Bucket (Recommended)
To create a read permission policy for a specific cloud-storage bucket:
- In the Create policy page, click the JSON tab to open a JSON edit panel.
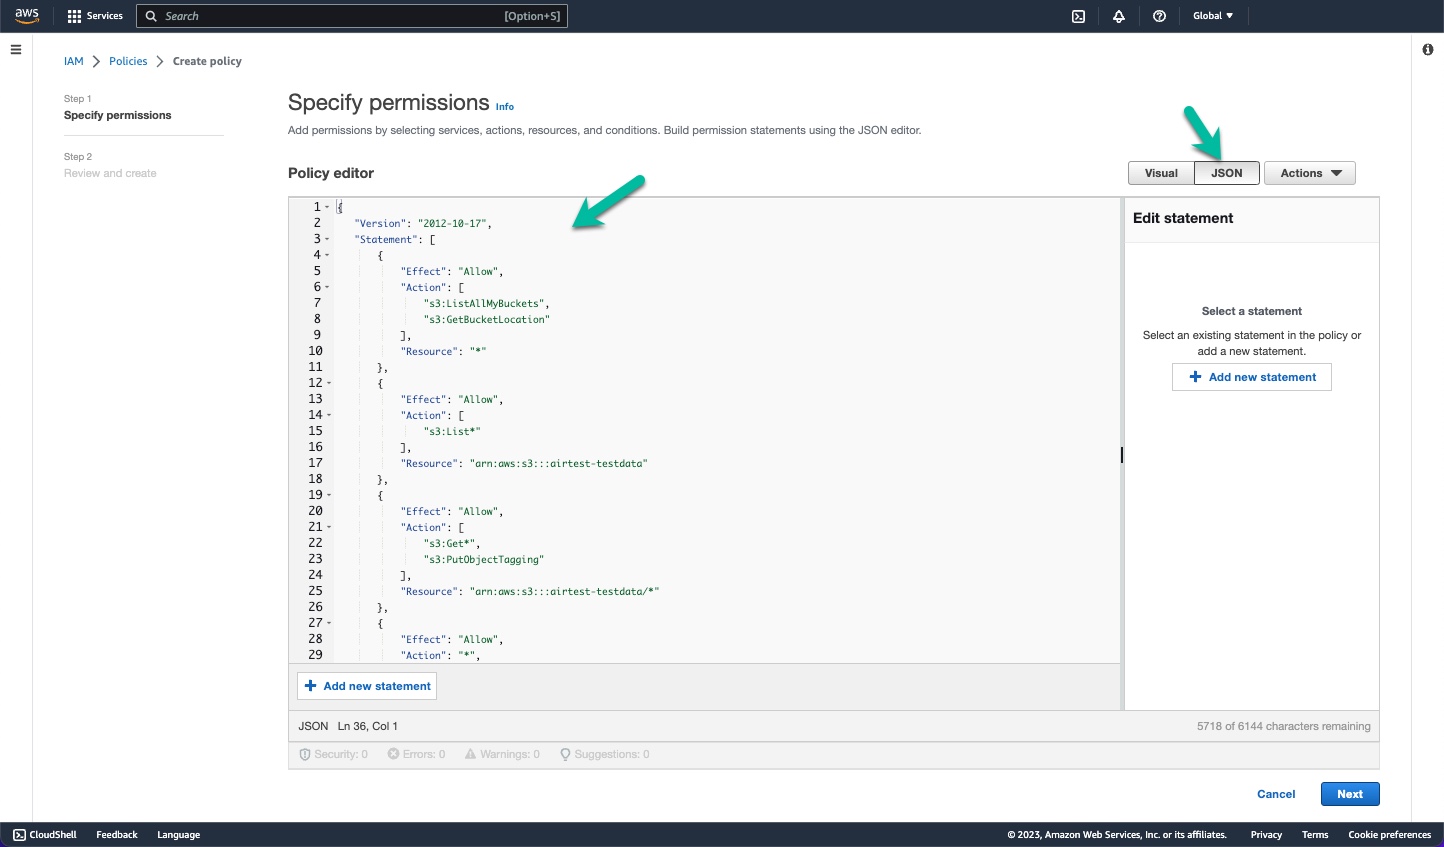
- In the JSON code area, replace or update the starter code with the policy that you want to use for your AWS bucket. For example, the following is a JSON definition for a policy that applies read-only permissions to a specific bucket named
arn:aws:s3:::airtest-testdata. If you use this template, be sure to update it for your correct bucket name and to replaceEXTERNAL-IDwith the unique external ID for your ChaosSearch cluster.
{
   "Version": "2012-10-17",
   "Statement": [
       {
           "Effect": "Allow",
           "Action": [
               "s3:ListAllMyBuckets",
               "s3:GetBucketLocation"
           ],
           "Resource": "*"
       },
       {
           "Effect": "Allow",
           "Action": [
               "s3:List*"
           ],
           "Resource": "arn:aws:s3:::airtest-testdata"
       },
       {
           "Effect": "Allow",
           "Action": [
               "s3:Get*",
               "s3:PutObjectTagging"
           ],
           "Resource": "arn:aws:s3:::airtest-testdata/*"
       },
       {
           "Effect": "Allow",
           "Action": "*",
           "Resource": [
               "arn:aws:s3:::cs-EXTERNAL-ID",
               "arn:aws:s3:::cs-EXTERNAL-ID/*"
           ]
       }
   ]
}
Click Next. The Review and create page appears.
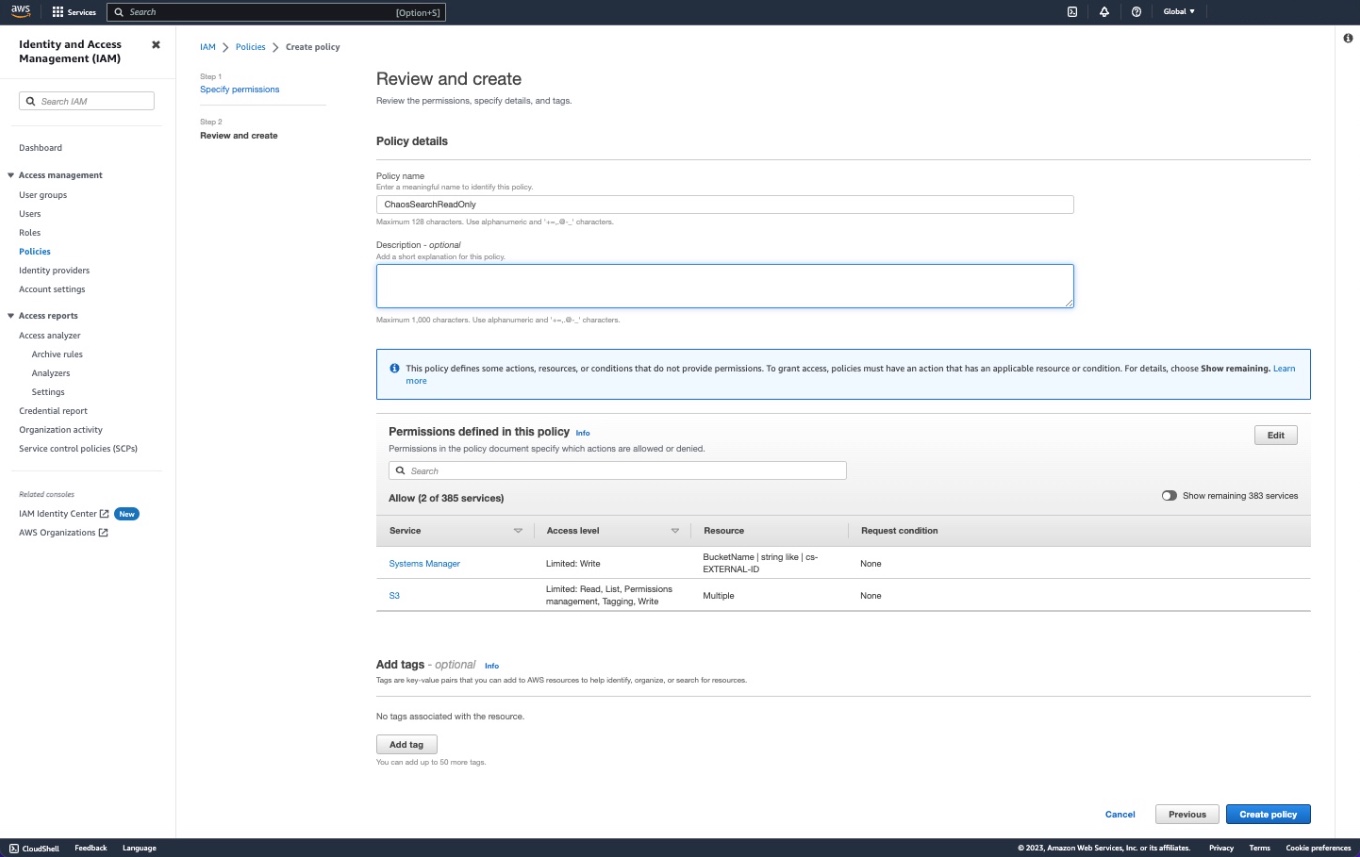
- In the Name field, type a name for the policy. This example uses the name
ChaosSearchReadOnly. - Type a brief description for the policy (optional).
- Click Create policy. The system creates the new policy and displays the Policies page.
The next step is to attach the policy to the ChaosSearch role that you created previously.
The following sections have some alternate permission examples for prefix-based buckets, all buckets, or KMS encrypted buckets. You can skip these sections unless you want to use one of these permission definitions for Step 2 above.
Read-only Permissions – Prefix-Specific Buckets
As an alternative policy, the following example is a JSON definition for a policy that applies read-only permissions to bucket names that begin with the same /some/path/prefix value. If you use this template for Step 2 in the previous section, specify the correct path prefix for your bucket and replace EXTERNAL-ID with the external ID for your account.
{
    "Version": "2012-10-17",
    "Statement": [
        {
            "Effect": "Allow",
            "Action": [
                "s3:ListAllMyBuckets",
                "s3:GetBucketLocation"
            ],
            "Resource": "*"
        },
        {
            "Effect": "Allow",
            "Action": [
                "s3:List*"
            ],
            "Resource": "arn:aws:s3:::SOURCE_BUCKET"
        },
        {
            "Effect": "Allow",
            "Action": [
                "s3:Get*",
                "s3:PutObjectTagging"
            ],
            "Resource": "arn:aws:s3:::SOURCE_BUCKET/some/path/prefix/*"
        },
        {
            "Effect": "Allow",
            "Action": "*",
            "Resource": [
                "arn:aws:s3:::cs-EXTERNAL-ID",
                "arn:aws:s3:::cs-EXTERNAL-ID/*"
            ]
        }
    ]
}
Read-only Permissions – All Buckets (Not Recommended)
The following policy example grants ChaosSearch read access to all cloud-storage buckets. This is not the typical policy configuration. This configuration is included as an example for some sites where all-bucket-access might be convenient for a period of time, or to easily grant access to all buckets of a demo/test environment where the bucket inventory might change frequently. If you use this template for Step 2 in the IAM Roles section, replace EXTERNAL-ID with the external ID for your account.
{
    "Version": "2012-10-17",
    "Statement": [
            {
            "Effect": "Allow",
            "Action": [
                "s3:Get*",
                "s3:List*"
            ],
            "Resource": "*"
            },
            {
            "Effect": "Allow",
            "Action": "*",
            "Resource": [
                "arn:aws:s3:::cs-EXTERNAL-ID",
                "arn:aws:s3:::cs-EXTERNAL-ID/*"
            ]
            }
    ]
}
KMS Encryption
If the objects stored in S3 are encrypted, there is no need to decrypt these objects. ChaosSearch works natively with these objects when the appropriate resources are defined in the IAM Policy. An example of a policy for encrypted buckets follows. If you use this template for Step 2 in the IAM Roles section, update your bucket name(s), KMS keys, and EXTERNAL-ID with the external ID for your account.
{
    "Version": "2012-10-17",
    "Statement": [
        {
            "Action": [
                "kms:GenerateDataKey",
                "kms:Decrypt"
            ],
            "Effect": "Allow",
            "Resource": [
                "arn:aws:kms:us-east-1:123456789012:key/enter-key-here",
                "arn:aws:kms:us-east-1:123456789012:key/enter-key-here",
                "arn:aws:kms:us-east-1:123456789012:key/enter-key-here",
                "arn:aws:kms:us-east-1:123456789012:key/enter-key-here"
            ]
        },
        {
            "Effect": "Allow",
            "Action": [
                "s3:Get*",
                "s3:List*",
                "s3:PutObjectTagging"
            ],
            "Resource": "*"
        },
        {
            "Effect": "Allow",
            "Action": "*",
            "Resource": [
                "arn:aws:s3:::cs-s3bucketname",
                "arn:aws:s3:::cs-s3bucketname"
            ]
        },
        {
            "Effect": "Allow",
            "Action": "*",
            "Resource": [
                "arn:aws:s3:::cs-s3bucketname/*",
                "arn:aws:s3:::cs-s3bucketname/*"
            ]
        },
        {
            "Effect": "Allow",
            "Action": "*",
            "Resource": [
                "arn:aws:s3:::cs-*"
            ]
        },
        {
            "Effect": "Allow",
            "Action": "*",
            "Resource": [
                "arn:aws:s3:::cs-*/*"
            ]
        },
        {
            "Effect": "Allow",
            "Action": "sqs:*",
            "Resource": [
                "arn:aws:sqs:*:123456789012:s3-sqs"
            ]
        }
    ]
}
In the sample policy, note the following code constructions:
- The first statement provides ChaosSearch with access to the
Get,List, andPutObjectTaggingoperations (read-only access).
Note: "s3:PutObjectTagging" is optional. It is required only to enable object tagging in the ChaosSearch UI.
- The second statement provides a bucket for ChaosSearch to write its index data and statistics. The name of the bucket must be
cs-<external-ID>.
Attach the Policy to the ChaosSearch IAM Role
- On the Roles page, select your new ChaosSearch role that you just created. The role Summary page appears.
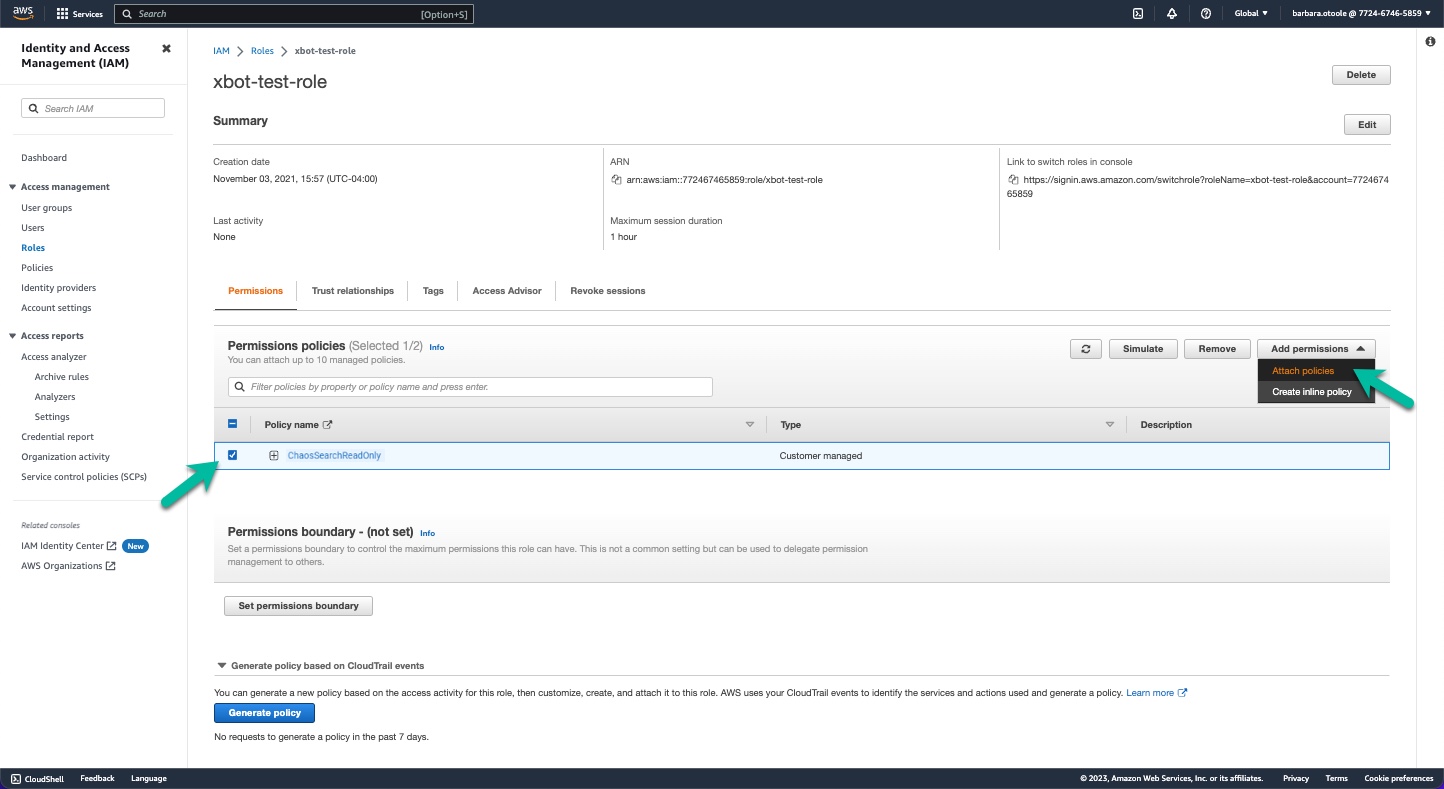
- Type your new ChaosSearch policy name (for example,
ChaosSearchReadOnly) in the Permissions policies filter to reduce the list of policy selections. - Select the new ChaosSearch policy and click Add permissions > Attach policy.
Your new policy is attached to the role.
Add Role ARN to ChaosSearch AWS Credentials
Follow these steps to obtain the role ARN which is required for the ChaosSearch console AWS Credentials page.
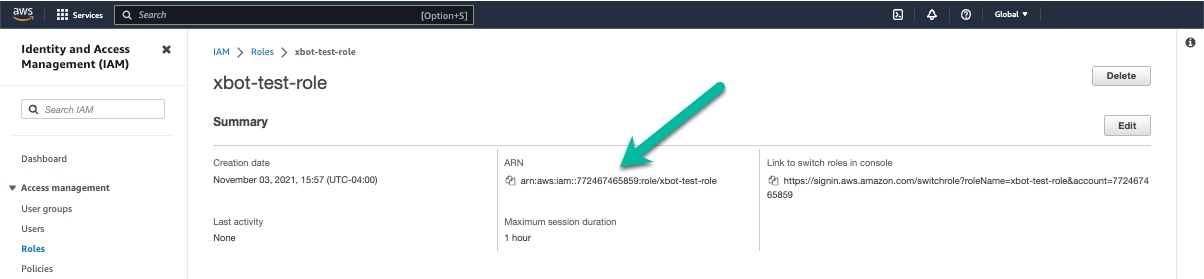
- In the AWS IAM console Roles page, click the newly created role to display its information.
- Copy the value in the ARN field.
- Navigate to the ChaosSearch console and open the Settings/Help page, and select AWS Credentials.
- Paste the role ARN into the AWS Role ARN field.
- Click Update.
- Make sure that the check mark icon is displayed to confirm that the role ARN is valid.

Troubleshooting S3 AccessIf the ChaosSearch console displays 'Request Failed' messages when you select a bucket or object group in the Storage window, review your permissions definition for the bucket(s) and if needed, review the AWS documentation for possible troubleshooting.
Updated about 1 year ago
What’s Next
Learn more about object storage and pushing logs to your storage buckets.