Live Indexing - Amazon SQS
How to enable AWS SQS messaging for Live Indexing of objects written to AWS S3 cloud storage buckets.
Amazon Simple Queue Service (SQS) is a fully managed message queuing for microservices, distributed systems, and serverless applications.
The ChaosSearch Live Indexing feature supports an integration with Amazon SQS event notifications. After configuring the SQS Integration, notifications are sent to ChaosSearch when new objects are written to an associated S3 bucket. By associating the SQS queue with an object group, the Chaos® Index service uses the notifications to find and to index the newly-written objects to make their content available for querying.

The process for configuring SQS notifications and Live Indexing has the following high-level steps:
- Create an AWS SQS queue to monitor an S3 bucket.
- Create an IAM policy for the SQS queue.
- Add the SQS policy to the ChaosSearch role.
- Use the SQS queue ARN in the live indexing object group definition.
- Enable notifications for the S3 bucket to its associated SQS queue.
Prerequisite InformationBefore you begin, make sure that you have information about the AWS S3 storage bucket and the ChaosSearch role.
This topic describes the steps to configure the AWS SQS queue and its policies, and how to associate the queue ARN with a live object group. To complete these steps, you must have AWS administration access to create SQS queues and to associate policies with roles.
Add an SQS Queue for a Storage Bucket
For Live indexing, you create one SQS queue to process notification for the objects created in an S3 storage bucket.
To create an SQS queue to process notifications on an S3 storage bucket:
- Log in to the AWS console using your AWS account.
- In the AWS Management Console, navigate to the Simple Queue Service -> Create Queue page.
- Use the default Standard queue.

- In the Name field, type a name for the queue.
- In the Visibility timeout field, increase the default value from from 30 seconds to 5 minutes.
- Scroll down to Access Policy.
- Select the Advanced option.

- In the JSON window, replace the default content with the following JSON statements to ensure that the S3 bucket can send events to the queue and that ChaosSearch has permission to see messages on the queue.
{
  "Version": "2012-10-17",
  "Id": "arn:aws:sqs:AWS-REGION:111111111111:NEW-SQS-QUEUE-NAME",
  "Statement": [
    {
      "Effect": "Allow",
      "Principal": "*",
      "Action": "sqs:SendMessage",
      "Resource": "arn:aws:sqs:AWS-REGION:111111111111:NEW-SQS-QUEUE-NAME",
      "Condition": {
        "ArnEquals": {
          "aws:SourceArn": "arn:aws:s3:::S3-BUCKET-NAME"
        }
      }
    },
    {
      "Effect": "Allow",
      "Principal": {
        "AWS": "arn:aws:iam::<<111111111111:role/chaossearch-role>>"
      },
      "Action": "sqs:*",
      "Resource": "arn:aws:sqs:AWS-REGION:11111111111:NEW-SQS-QUEUE-NAME"
    }
  ]
}- In the sample code, make sure that you replace the substitution values (and any enclosing <<>> characters) with your information:
- Replace
aws-regionwith the SQS queue's AWS region. - Replace
111111111111with your AWS account ID. - Relace
new-sqs-queue-namewith the SQS queue name that you specified in Step 4 earlier. - Replace
s3-bucket-namewith the name of the S3 bucket that you want to monitor. - Replace
chaossearch-rolewith the ChaosSearch role.
- Click Create queue. The following page confirms that the queue is created.

Note the ARN value for the SQS queue. The ARN value is needed for the Live Indexing field when creating the object group.
Create SQS Policy
Create an AWS policy for the SQS queue to associate with the ChaosSearch role.
To create an SQS policy:
- Log in to the AWS console using your AWS account.
- In the AWS Management Console, navigate to the IAM service page.
- Select Policies in the left navigation menu and click Create policy.
- In the Create Policy window, select the JSON tab to specify the policy settings.

- Add the following text inside the
Statementbrackets area. Specify the ARN from the SQS queue created in the previous steps in the substitution value, and be sure to delete the <<>> characters:
{
            "Effect": "Allow",
            "Action": [
                "sqs:DeleteMessage",
                "sqs:SendMessage",
                "sqs:ReceiveMessage",
                "sqs:GetQueueUrl"
            ],
            "Resource": [
                "arn:aws:sqs:AWS-REGION:AWS-ACCOUNT:SQS-QUEUE-NAME"
            ]
        }
A sample window follows:

- Click Next: Tags, then click Next: Review. Type a name, optionally a description, for the new SQS policy.

- Click Create policy. The policy is added to the list of IAM policies. The next step is to add the policy to the ChaosSearch role.
Add SQS Policy to ChaosSearch Role
You must add the SQS policy to the AWS role that is used to access the bucket.
- Log in to the AWS Console and navigate to the IAM section.
- On the Roles page, locate the AWS role that you created for your ChaosSearch access.
- In the right side of the window, select Add permissions > Attach policies. The Attach policies to <role> window appears.

- Filter and select the SQS policy associated with your role (in this sample case,
xbot-sqs-policy). - Click Attach policies. The Roles page updates to show that the SQS policy is now attached to the intended AWS user.

When you create the object group for the bucket that has been updated with the SQS messaging controls, the Live Indexing option requires the ARN for the SQS queue that is monitoring for new activity in that bucket. You can obtain the ARN in AWS by clicking your SQS queue name and copying the ARN value from its configuration. A sample follows:

Add SQS ARN to ChaosSearch Object Group
You must associate your SQS queue ARN value with the object group that you create to index the related S3 bucket.
- Create your object group following the steps described in Creating Object Groups.
- In the Create Object Group window, as in the following example, paste the SQS queue ARN value into the Live Indexing field. A sample follows.

- Click Create. The object group is created.
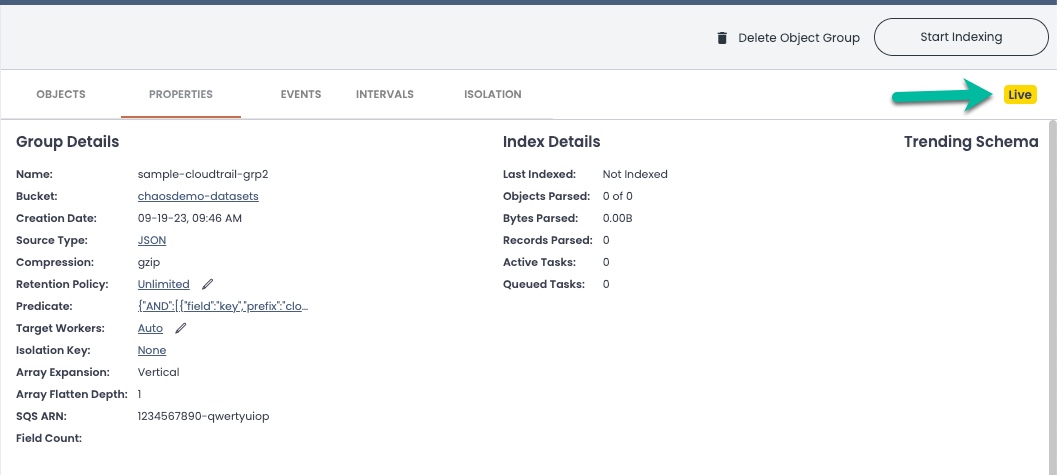
- Navigate to the object group Properties tab, and you should see that Live Indexing is configured. A sample window follows.
- Click Start Indexing when you are ready to index the related objects in the S3 bucket.
Enable Notifications on the S3 Bucket
Enable notifications on the S3 bucket to its SQS queue:
- Navigate to the AWS S3 console.
- Click on the name of the S3 bucket associated with your Live Indexing object group. The S3 bucket details page opens.
- Click Properties.
- Scroll down in the page to the Events Notifications section.
- Click Create event notification. The Create event notification page appears.
- Under General configuration, in the Event name field, type a name.
- Under Event types, Object creation, select All object create events.

- Scroll down to Destination, select SQS Queue as the destination, then Choose from your SQS queues.
- Select the SQS queue name that you associated with the bucket.

- Click Save changes.
Notes
Some important notes:
- For indexing efficiency, ChaosSearch batches indexing data for 2-3 minutes, so there is a short delay before indexed data is available for query. The batch time is configurable and can be adjusted if needed.
- Live Indexing does not update the ChaosSearch index files when a source data file is deleted. If a data file is deleted after it has been indexed, the content from the source data file remains in the existing daily interval files.
Updated about 1 year ago