GCP Cloud Storage Access
Review the prerequisites and steps for connecting ChaosSearch to your Google Cloud Platform (GCP) Cloud Storage buckets.
If you use GCP Cloud Storage for your log and event files, this topic describes how to provision ChaosSearch with access to your GCP Cloud Storage buckets. You can perform these access setup steps manually from the GCP console.
The interface screens could vary.There are multiple versions of the GCP console and the order/terminology of following steps could be different for your version. These steps are intended as an overview of how to configure access roles and permissions.
Create a New Role for ChaosSearch in GCP
- Log in to your GCP console.
- In the GCP services menu, click IAM & Admin.
- In the left menu, click Roles.
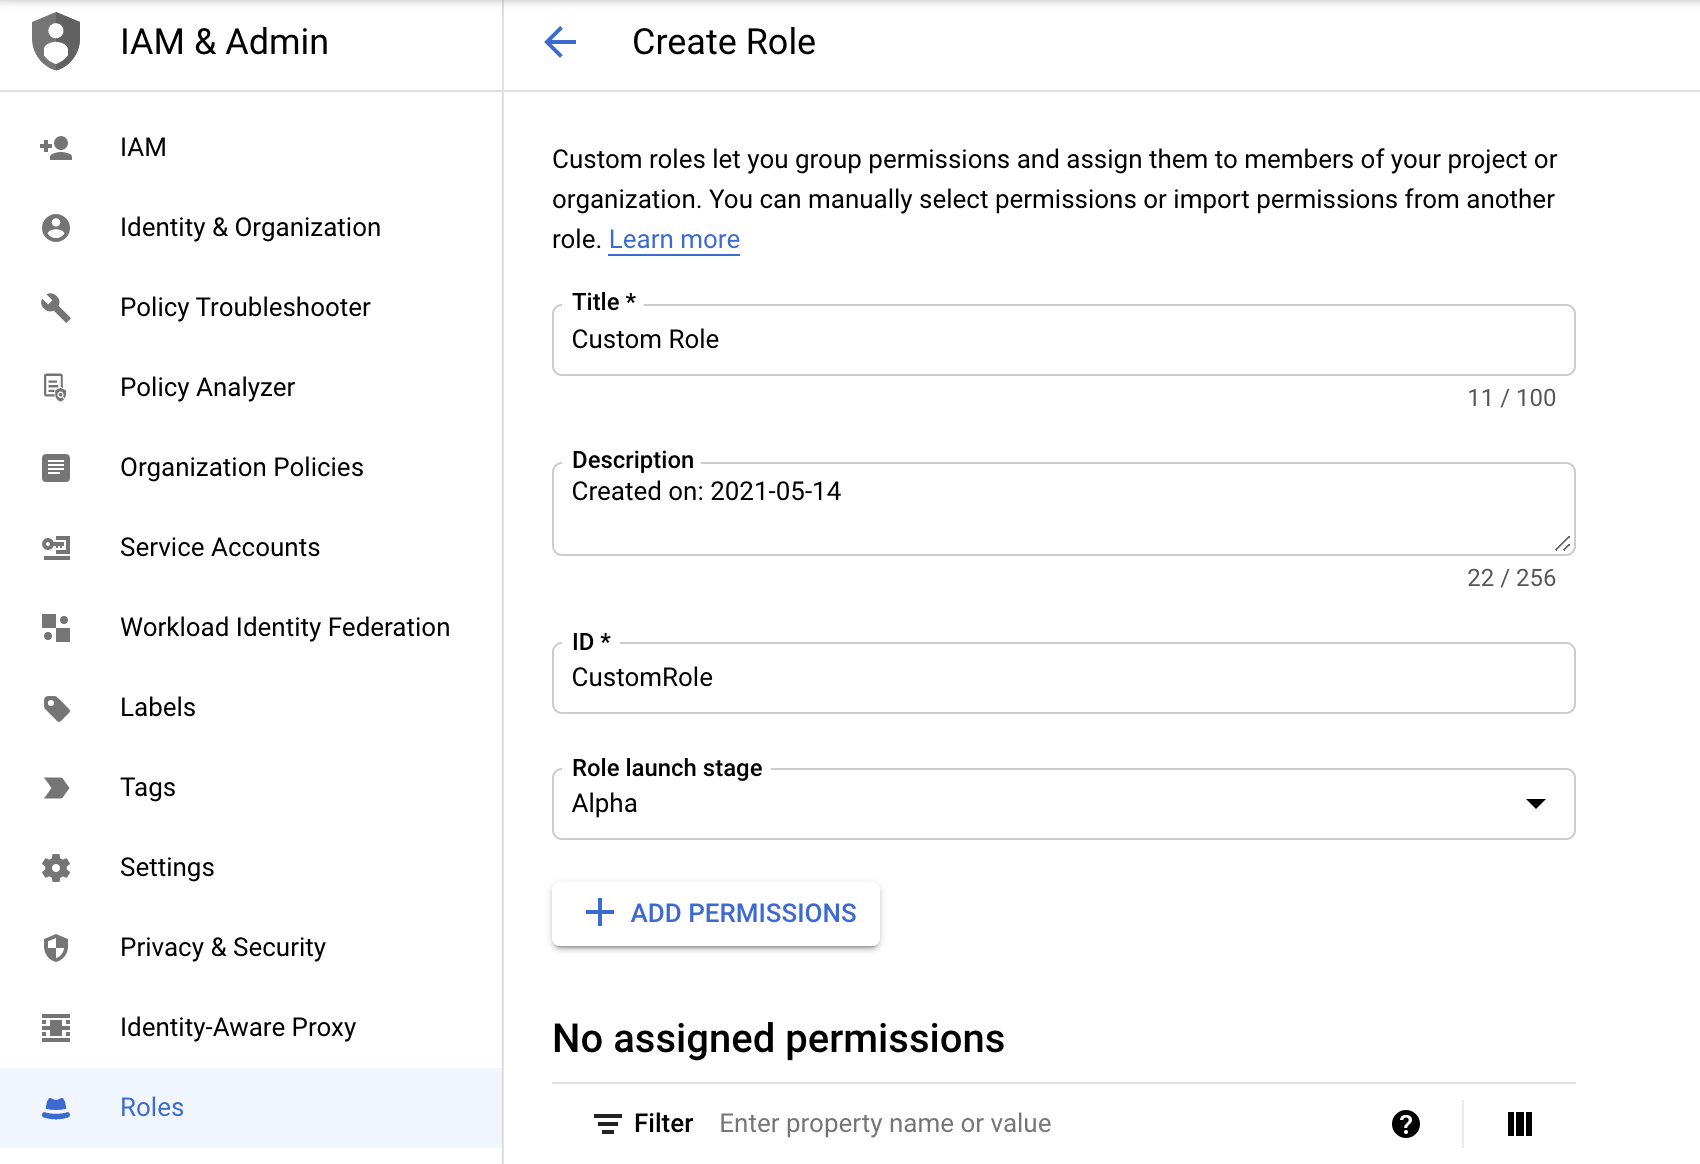
- In the Roles page, click + CREATE ROLE in the top menu. The Create Role page appears.
ChaosSearch Cloud Storage Bucket AccessIn order for ChaosSearch to read the bucket(s) that you want to start indexing, ChaosSearch must be able to discover and list all of the Cloud Storage buckets. If you have any questions, please contact the ChaosSearch Customer Success team.
Add Read-only Permissions - All Buckets
- Type a title for the role. For example, you could use name ChaosSearchReadOnly.
- Type a brief description for the role (optional).
- Add an ID for the role. You can use the same text as the title.
- Select a Role launch stage such as Alpha, Beta, General Availability, or Disabled.
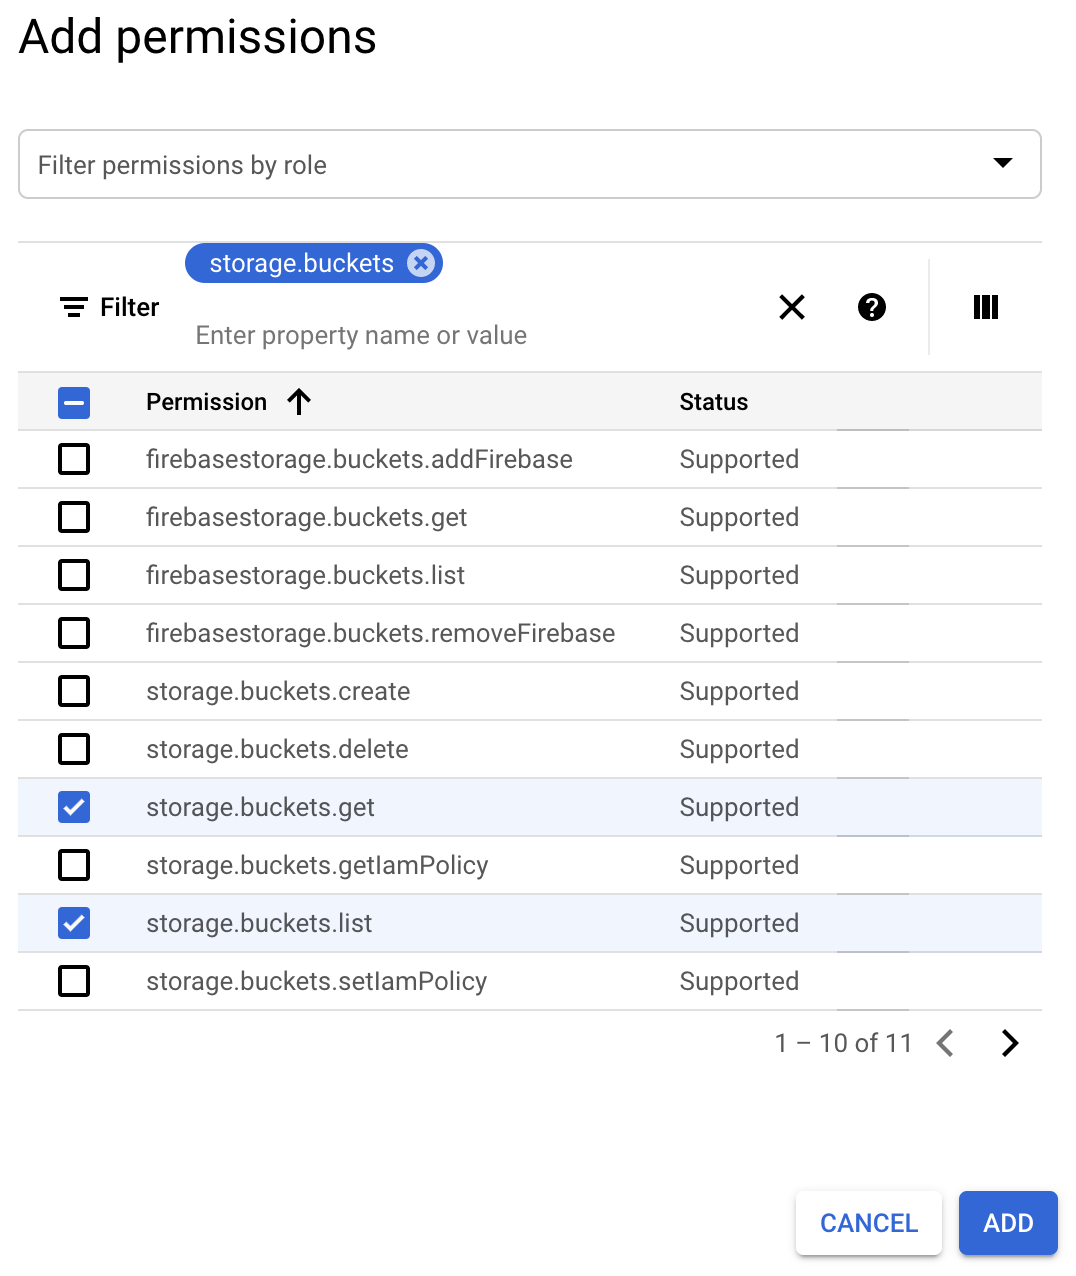
- Click + ADD PERMISSIONS and select the storage.buckets.list and storage.buckets.get permissions.
- Click ADD to save the permissions.
- In the Create Role page, click CREATE. Your new role is added to the Roles page.
Create a New Service Account for ChaosSearch in GCP
Google Cloud Service AccountsChaosSearch uses short-lived OAuth 2.0 tokens obtained from your GCP service account to gain only the access required in the GCP space. Follow these steps to delegate access to your cloud storage buckets to the ChaosSearch service.
- Navigate to the Service Accounts page of the IAM service (Left menu > IAM & Admin > Service Accounts).
- Click + CREATE SERVICE ACCOUNT.
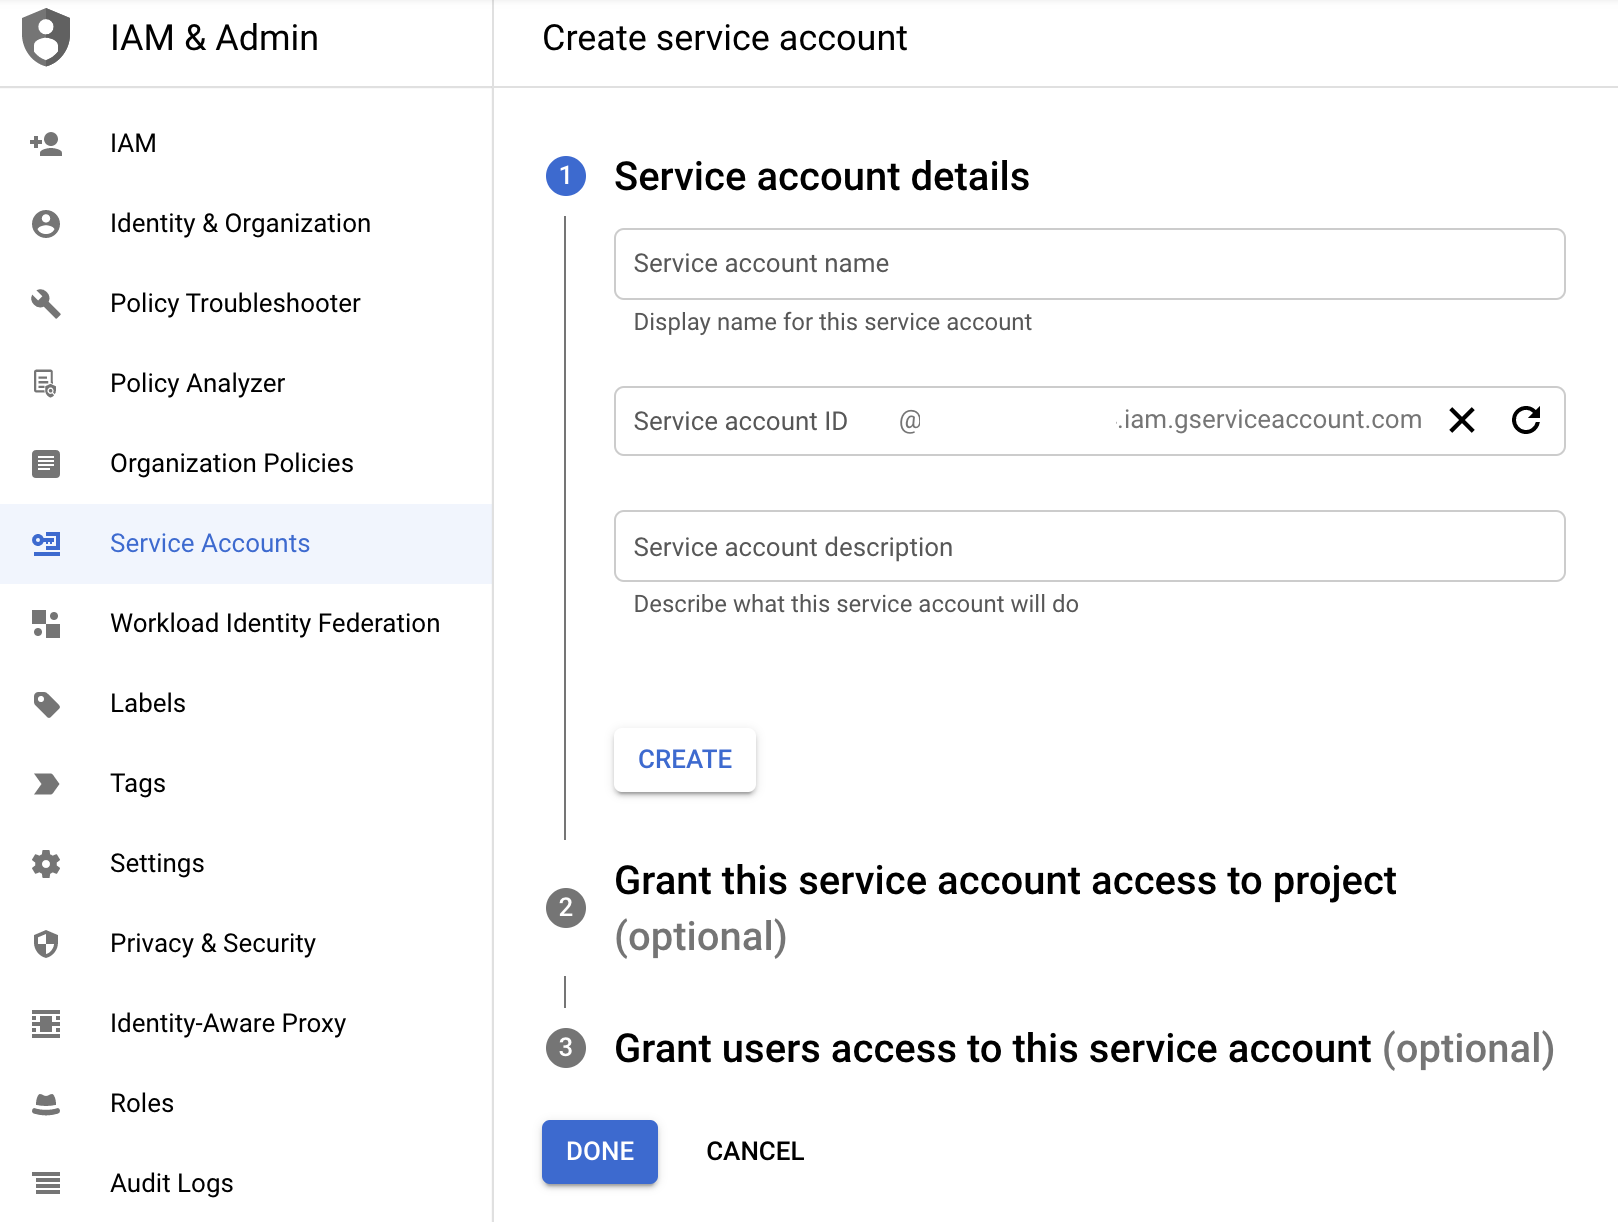
- Type a display name for the service account. For example, you could use ChaosSearch Access.
- Type a brief description for the account (optional).
- Click CREATE AND CONTINUE.
Grant Access to GCP Service Account
The service account that you created must be assigned several roles to support ChaosSearch activities:
- The role that you created in GCP using the previous steps.
- Two out-of-box roles named Storage Object Viewer and Storage Admin.
- For Live Object groups and live indexing support, the Pub/Sub Subscriber role to process notifications of new cloud storage objects to index.
- To execute GCP metrics queries that will perform health metrics monitoring via the service account, the Monitoring Admin role is also required. (This supports health monitoring for metrics like acknowledged and unacknowledged messages from Pub/Sub.)
To grant access to the service account:
- Add the role that you created in the previous steps (called ChaosSearchReadOnly in the example above). The role can be found under the custom section.
- Search for the Storage Object Viewer role and select it to add it to the service account.
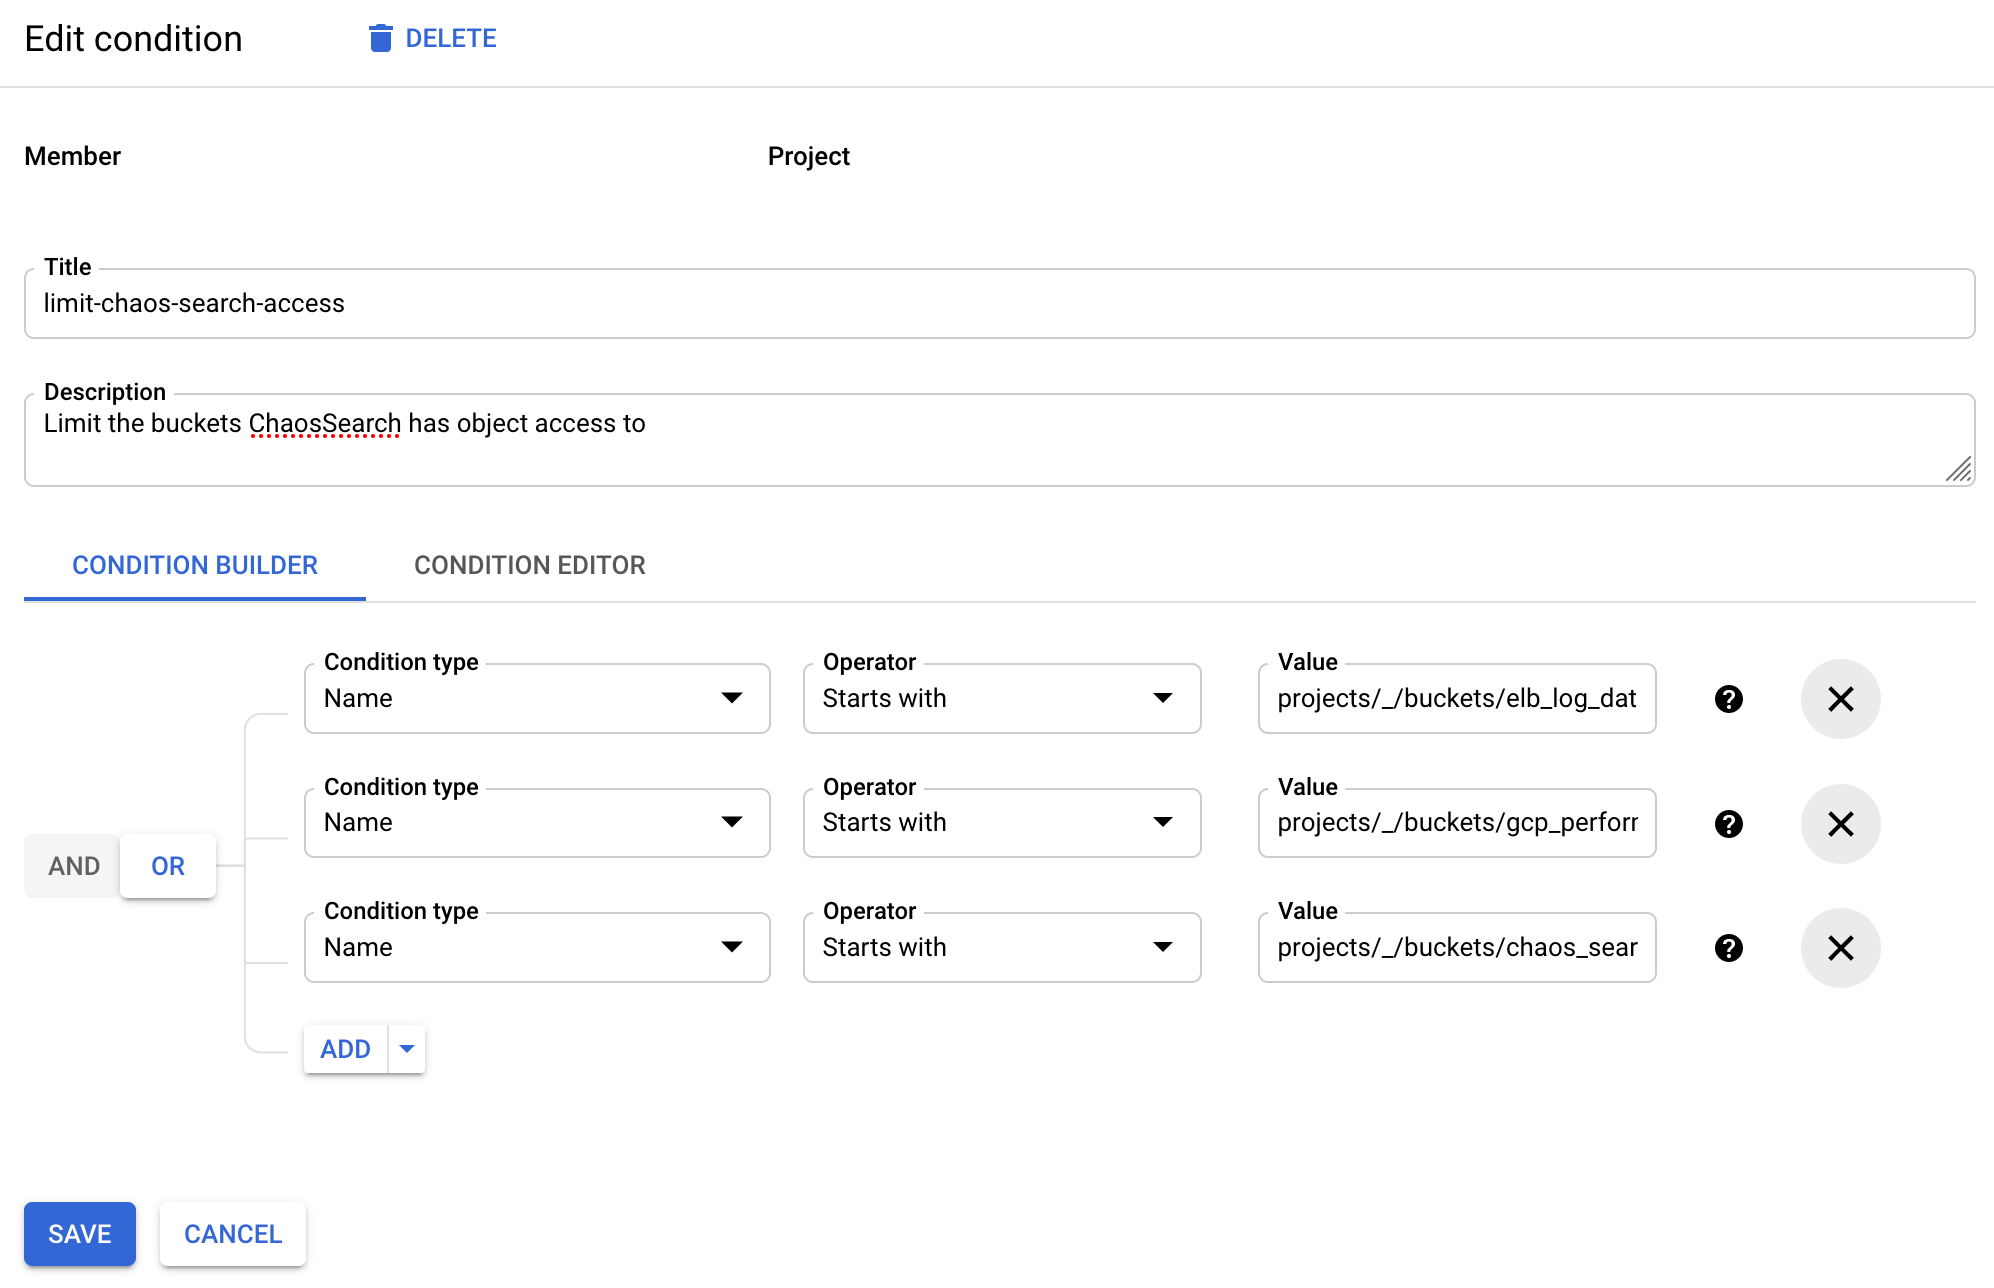
- Optionally, you can define conditions to the Storage Object Viewer role to restrict visibility to only the buckets that you want ChaosSearch to access.
- After adding the Storage Object Viewer role, click Add condition.
- In the Condition type field, select Name.
- In the Operator field, select Starts with.
- In the Value field, type projects//buckets/_bucket_name to limit the object read access to buckets that begin with the specified name string. You can create multiple conditions joined together with OR operators to restrict access to the specified buckets.
Limit access to specific buckets with ACLIf you use ACL policies on your buckets, the role conditions suggested above might not work. In that event, there are other ways to limit the buckets that ChaosSearch can access. Contact ChaosSearch Customer Success for more information.
- Search for the Storage Admin role and select it to add it to the service account.
- Click Add condition next to the Storage Admin role.
- In the Edit condition window, type a title for the condition. For example, you could use Limit Chaos Meta Bucket.
- Type a brief description for the condition (optional).
- Click the CONDITION EDITOR tab and type the following text. Make sure to replace {your uid here} with the UID that ChaosSearch provided to you.
Storage Admin Access ScopeThe new role has limited access to only a new bucket managed by ChaosSearch that is used for storing the index data for your data files. This bucket is created automatically for you.
resource.name.startsWith("projects/_/buckets/cs-{your uid here}")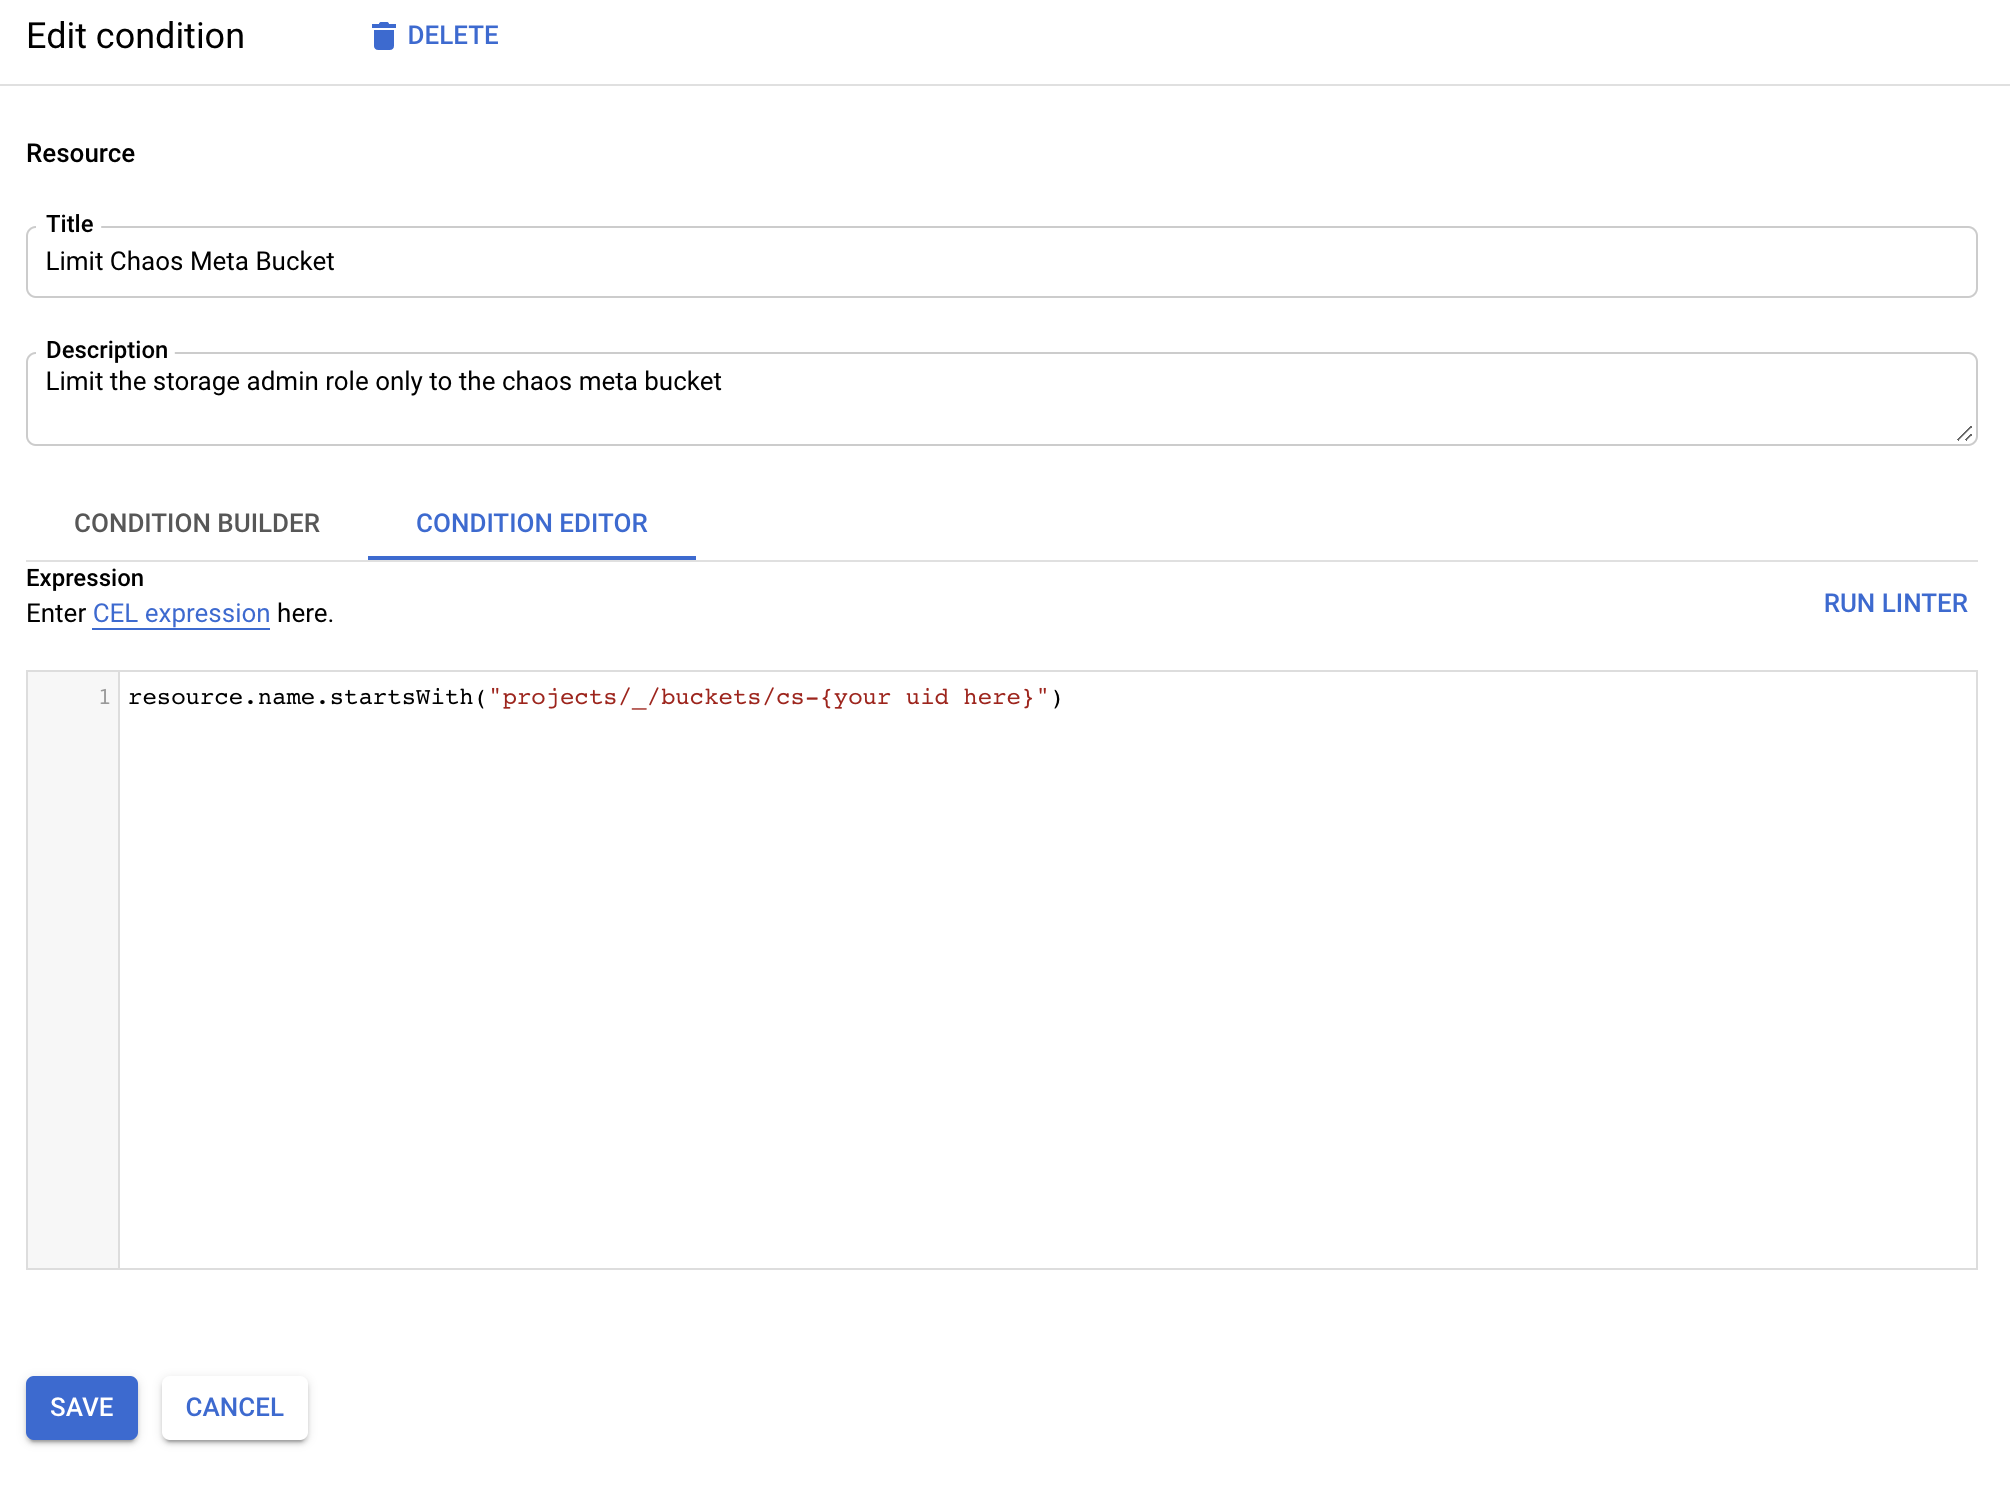
- Click SAVE in the Edit condition window.
- Click Add Another Role, filter for the Monitoring Admin role, and add it.
- Click Add Another Role, filter for the Pub/Sub Subscriber role, and add it.
- Click DONE in the Create service account window.
- The Service accounts page displays your role and policy changes.
Grant ChaosSearch Access to the Service Account
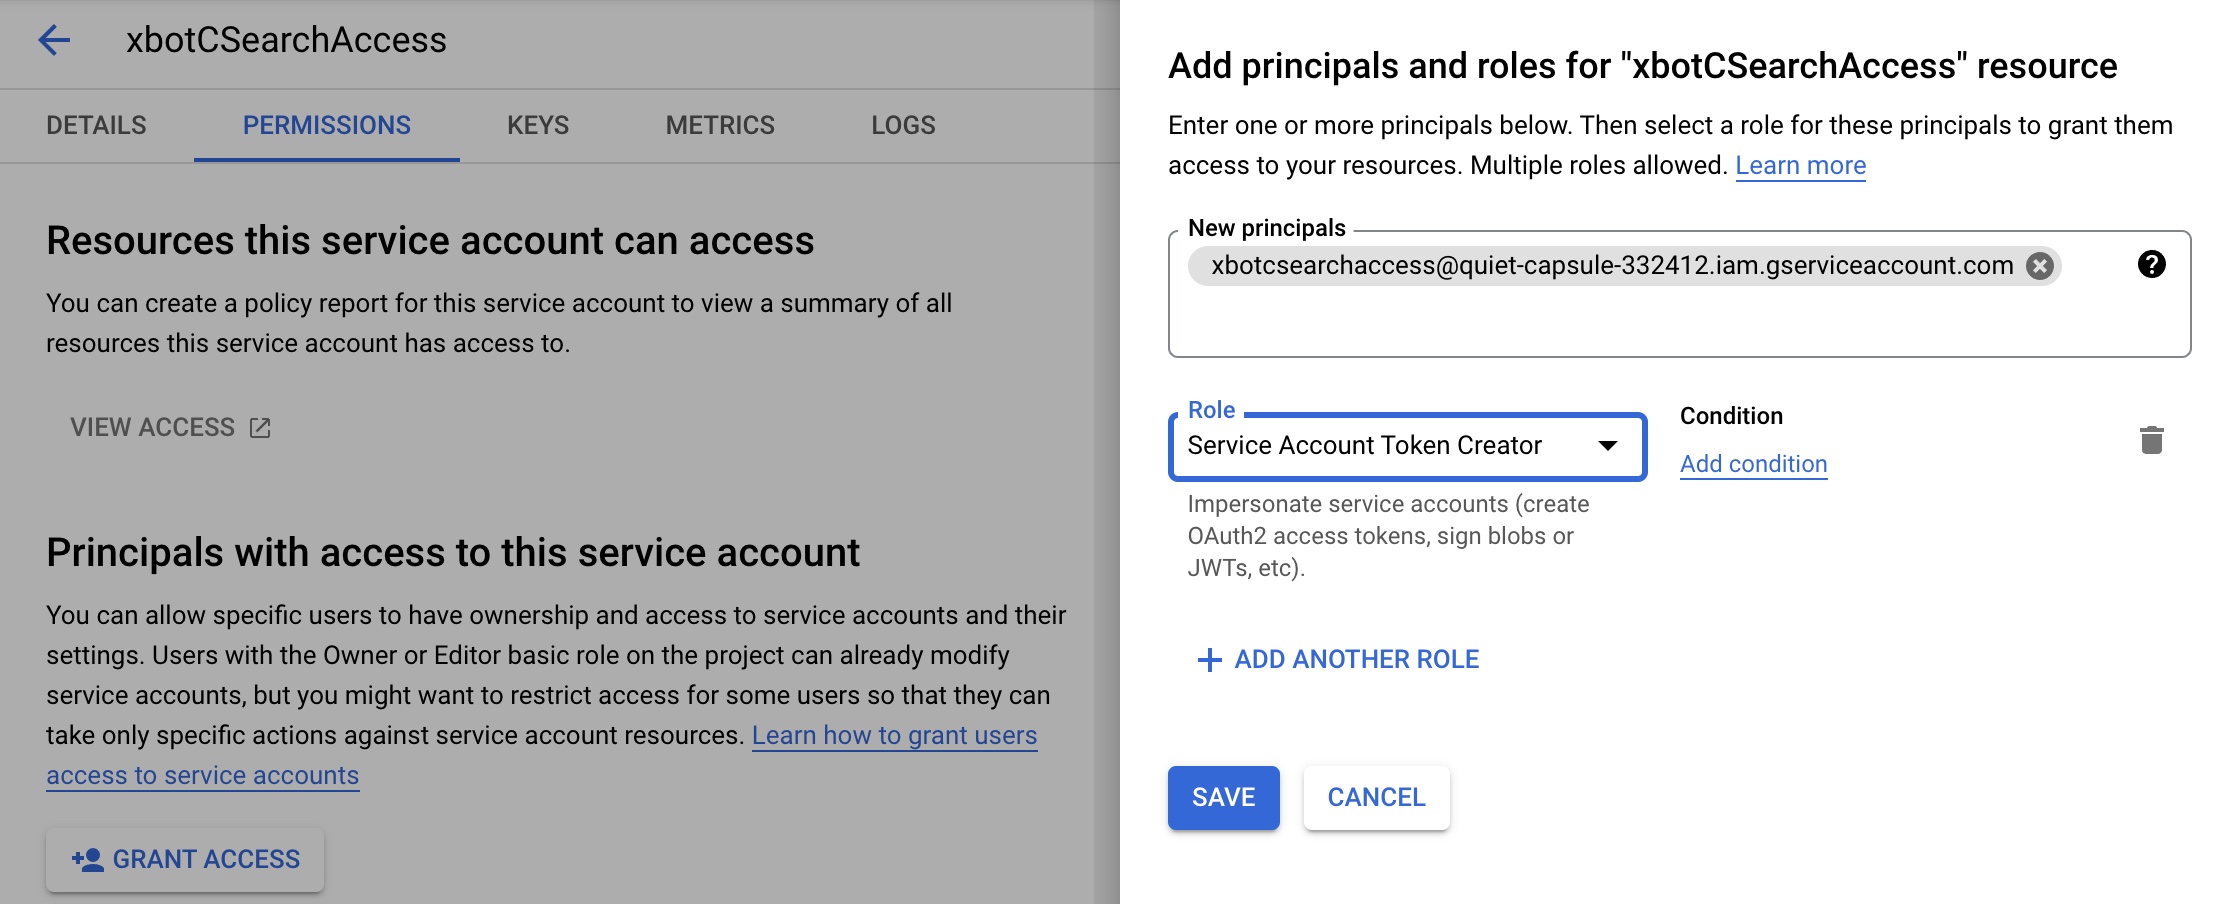
- Navigate to the Service accounts page of the IAM service (Navigation Menu > IAM & Admin > Service Accounts).
- Click the email of the service account you just created to display the account details.
- Click the PERMISSIONS tab at the top.
- Click + GRANT ACCESS in the Principals section.
- In the New principals field, type or paste the ChaosSearch service account provided to you.
- In the Role field, select the Service Account Token Creator role.
- Click SAVE.
Add Your Service Account to ChaosSearch
- Log in to the ChaosSearch console using your account.
- Click your account name in the top-right and select Settings/Help.
- Click GCP Credentials in the left menu.
- In the Region field, make sure that your home region is selected.
- In the GCP Service Account field, paste the GCP email string from the Service accounts page.
- Click Update and verify that the check mark icon appears.

Updated about 1 year ago
What’s Next
Learn more about object storage and pushing logs to your storage buckets.